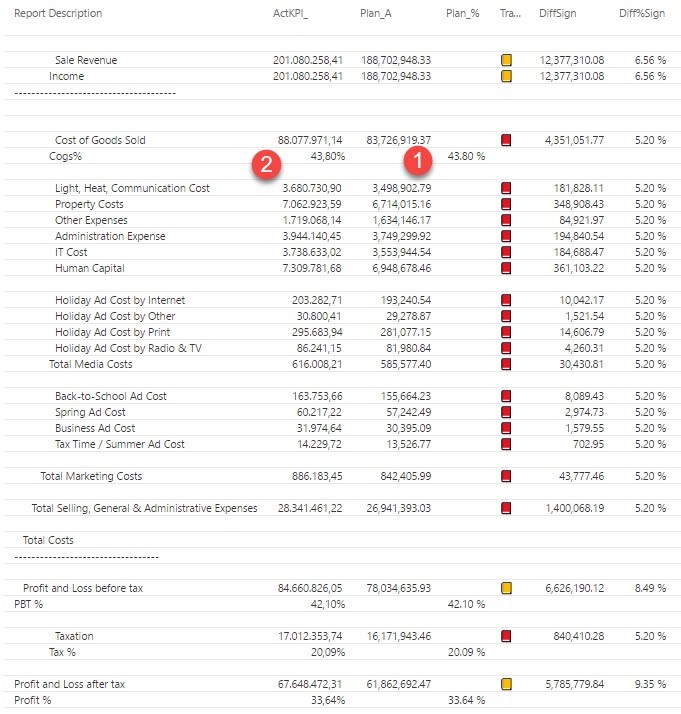
DAX evaluation context indicator with syntax highlighting

This is a post about a feature request, that definitely would make my life easier (and I guess others’ too):

Evaluation context and its transition is one of the hardest concepts in DAX and I would find it extremely helpful, if syntax highlighting would assist us here. Let the colour of the table name show whether the expression will be evaluated:

Read more

Right Aligning Text in Power BI: Format Improvements for Easy Profit&Loss Reports

Edit 14-Dec-2017: Now that we can right-align text measures in PowerBI, a SWITCH-measure like here: http://www.thebiccountant.com/2017/04/24/kpis-in-easy-profit-and-loss-for-powerbi/#comment-719 is the best alternative in my eyes. No need to read on 🙂

As shown in my last part of the Easy P&L-series, Power BI unfortunately still lacks some fundamental formatting options like:

  1. Right aligning text (please vote for it here: Right align text in Power BI – edit 15th Nov: We’re there: Right aligning text is available now: https://powerbi.microsoft.com/en-us/blog/power-bi-desktop-november-2017-feature-summary/)
  2. Display numbers in different formats within one column (either to be implemented as a “neutral” format for Switch-measures, where the referenced measures carry the formatting attributes already, or as a part of a formula-based conditional formatting) (Thanks Matt for the voting-link: Conditional format SWITCH measure)

So for the moment I choose between the following workaround-options:

  1. Display %-values in a separate column
  2. Format numbers as text and fill up with spaces so that all end up right aligned
  3. See the suggestion from Matt Allington in the comments below (very nice)

Right aligning text or percentage figure in new column

For both options the preparations are the same:

Read more

Bulk-extracting Power Query M-code from multiple pbix files in Power BI

Edit: Unfortunately this method isn’t working any more for files with the latest Power BI file formats (including the enhanced metadata format).

If you want to audit or analyse the M-code of multiple Power BI pbix-files at once, you start with either:

  1. a from-folder query where you filter all files of interest or
  2. a table with the full file-path-specification of the files to be analysed in “Column1”.

Then you add a column where you call the function that extracts the M-code:

Function to extract the M-code

https://gist.github.com/dbb3cd22d0825cb7d0d8f95d1ac35a31

This code is a variation of Igors function which retrieves the code from an opened pbix-file. So now you can apply it to closed pbix-files as well.

For method 1 you call it like so (as it takes the full string for the file-path as its parameter):

Read more

Create a function library in Power BI using M-Extensions

Having the ability to use own M-function the same way than native functions in Power BI and Excel has been one of my biggest wishes for quite some time. So I was more than amazed to see Frank Tonsen’s comment showing a way to do exactly this in PowerBI, that has been available for almost half a year now: M-Extensions as part of the custom connectors.

Unlike custom connectors who show up in the import-dialogue and provide a custom tailored option for importing data or creating queries, M-Extensions don’t show up explicitly anywhere in Power BI: They just do their M(agic) job to make the functions that you’ve defined in them accessible, as if they were inbuilt native functions: Type their name into the formula bar like this (1):

And enjoy the function description (2: if you’ve specified it in the definition, which is optional):

Simplest example

  1. Your functions: Number.Double and Number.Triple
  2. Combined with the keyword “shared” and separated by “;”
  3. Prefix by “section MyLibrary” gives this text:
section MyLibrary;
shared Number.Double = (Number as number) =>
2 * Number;
shared Number.Triple = (Number as number) =>
3 * Number;


How to make M-Extensions work

Read more

Guest Post: Recursion in M for beginners

Intro from Imke: “I’m very proud to announce the 1st guest post on my blog written by Daniil Maslyuk. His Twitter slogan: “I am a fan of Power BI and avocados” made it instantly clear to me that this young man has an excellent eye for the essence: Just what it takes to write good blog posts. So I asked him to write a guest post on my blog. As it turned out, he was just about to start his own (XXLBI.com) which many of my readers will know already: It contains some very elegant DAX off the beaten track and is a real pleasure to read. So I’m very happy that he agreed to publish with me as well:”

When I was a school student, a teacher asked me if I knew what my life path number was.

  • What’s life path number?
  • It’s the number you get when you sum the digits of your birth date again and again until you get a single-digit number

Example: if you were born on 25 December 1963, your life path number would be 2:

  1.       2 + 5 + 1 + 2 + 1 + 9 + 6 + 3 = 29
  2.       2 + 9 = 11
  3.       1 + 1 = 2

Now, I’m not a big fan of numerology, but I am a big fan of Power Query. What does the former have to do with the latter? Life path numbers are calculated recursively, and you can totally do it in Power Query! In this article, I am going to introduce you to recursion in M.

The easy (but not the good) way

Read more

Custom Connector to import Google Sheets with OAuth2 authentication in PowerBI

EDIT 17th Feb 2022: Finally, we have the native connector in Power BI: Power Query Google Sheets connector – Power Query | Microsoft Docs – so no need for the workaround described in this blogpost.

EDIT 17th August 2019: Added instructions for the newly added consent screen below..

Recently I came across the need to connect to Google Sheets with a secure authentication process quite often, so I will share with you how and to what extend I got the custom connector working that I found here. It uses OAuth2 authentication, so you can share your workbook with selected colleagues and they will be prompted to enter their credentials in Power BI if they try to access these files.

High level overview

First you have to create an API in your Google account. This will enable other programs to connect to your data (provided they pass the correct credentials). After that you have to adjust the .mez-file to include the client id and client secret that identify your API. This data will be generated when setting up the API. After you’ve adjusted the .mez you have to store it in a dedicated folder so that Power BI can access it. Lastly, if you want to use this connector in the Power BI service, you have to add the .mez-file to a gateway.

Setup Google API

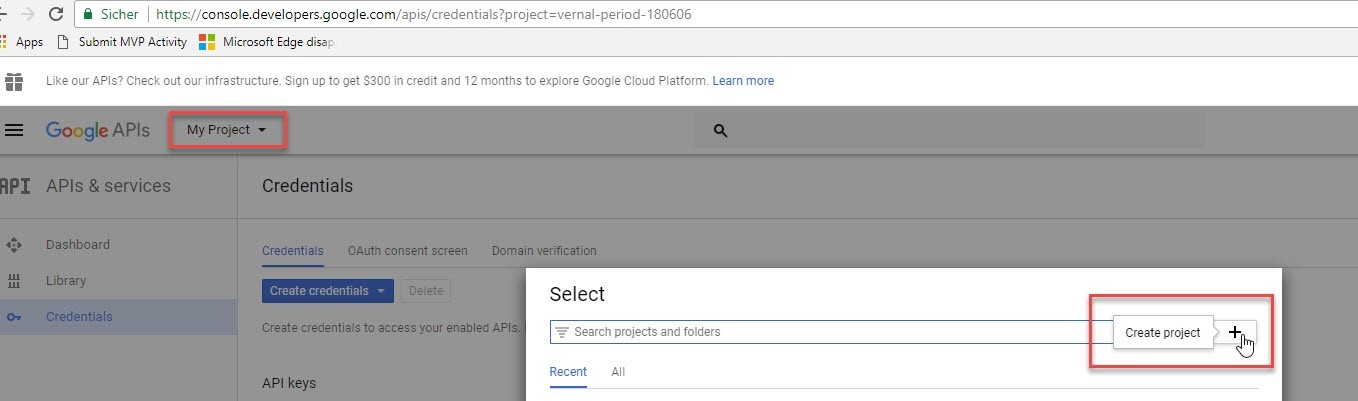
Go to the Google Developer API and if you don’t have a project yet, just create one:
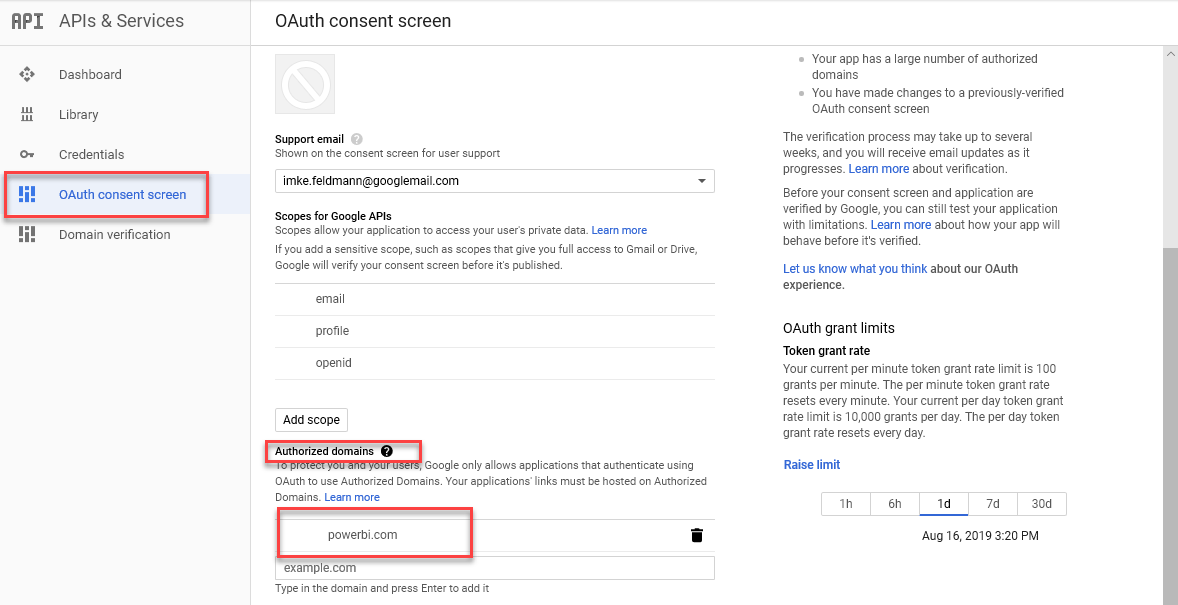
NEW: A OAuth consent screen will pop up and you have to give your app a name and fill in “PowerBI.com” into the “Authorized Domains”:
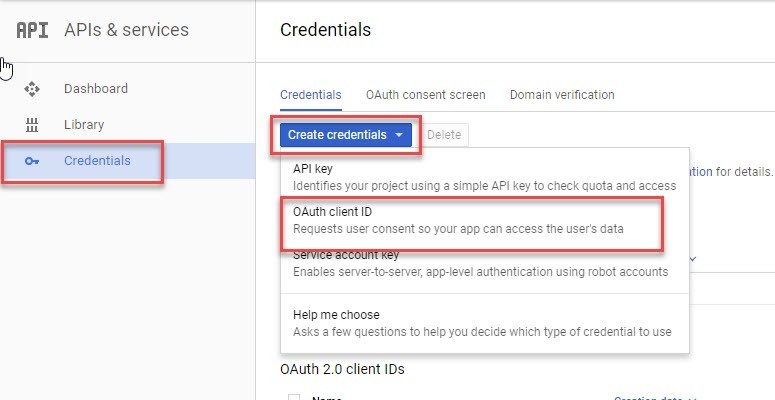
Next go to “Credentials” -> Create credentials and choose “OAuth client ID”:
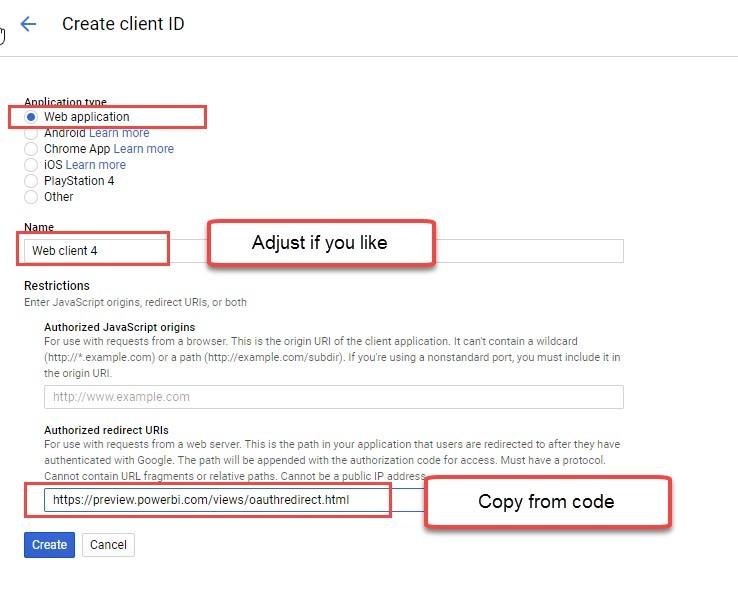
Choose “Web application”, adjust the “Name” if you like and paste the redirect-url into “Authorized redirect URLs”: https://preview.powerbi.com/views/oauthredirect.html
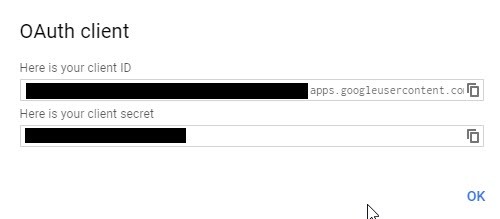
This will return the client ID and secret for your connector:
 

Adjust the files for the connector

Read more